Names and Roles in Wedding Photography - Part 2
How to identify them, facial-tag them, and increase your wedding photo sales
..continuing on from Part 1 of this tutorial.
Exporting Images and Keywords
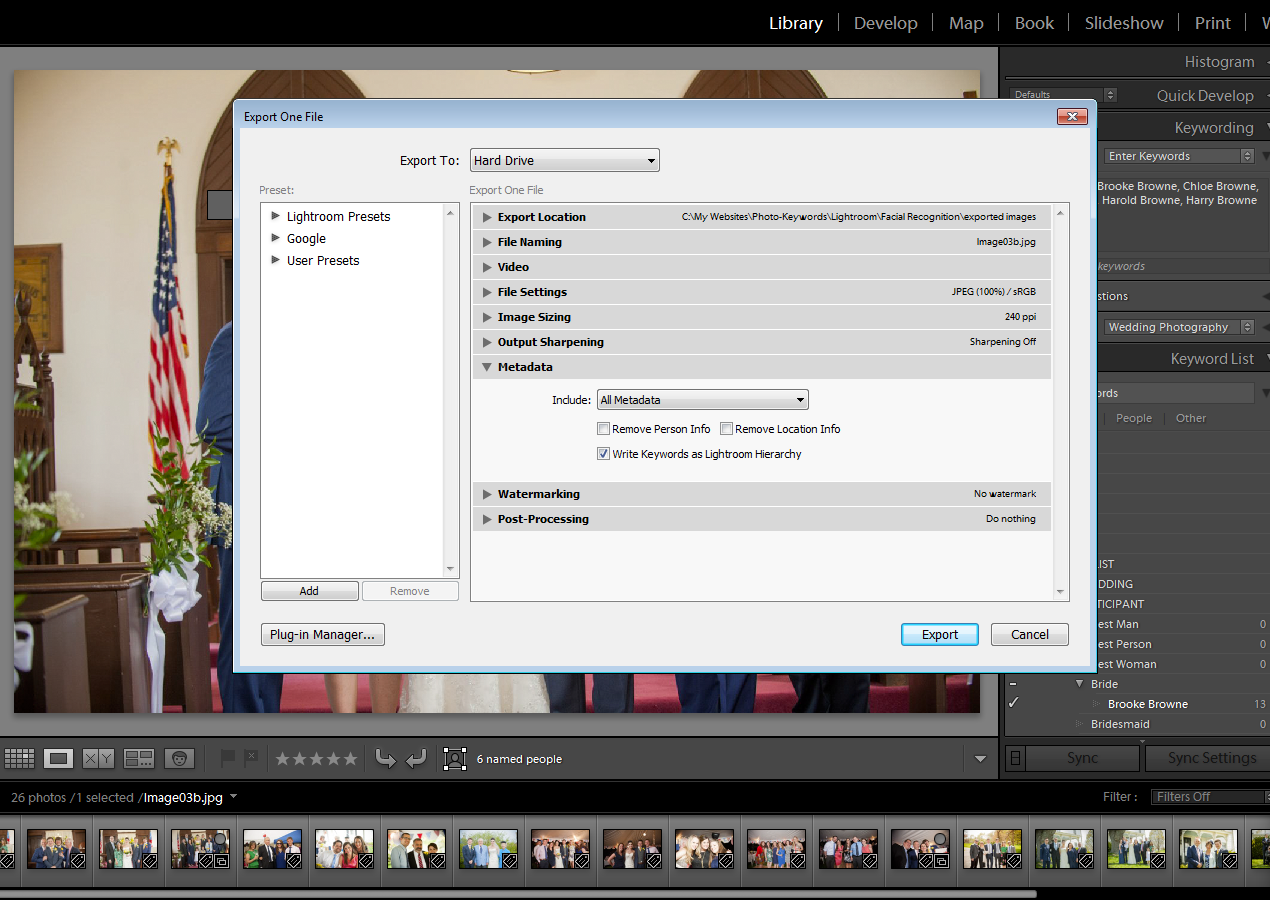
To save the keywords to the photos, we need to export them, by clicking 'File > Export' or Ctrl-Shift-E. When the Export window appears, find the 'Metadata' section and make sure that 'Write Keywords as Lightroom Hierarchy' is checked, and 'Remove Person Info' is unchecked. Click 'Export'.
Examining the stored meta-data
So how did Lightroom 6 actually store our facial-recognition keywords? To find out, we need to export one of the photos by clicking 'File > Export', or 'Control+Shift+E', and checking 'Write Keywords as Lightroom Hierarchy' in the 'Metadata' section of the 'Export' window. A program such as 'ExifToolGUI' gives the most comprehensive view of metadata stored in an image. Here's an example of 'People Keywords'-specific metadata found in one of the exported images that I was dealing with earlier:
| IPTC Keywords | Adam Browne,Bride,Brooke Browne,Brother of the Groom,Chloe Browne,Father of the Groom,Francis Browne,Groom,Harold Browne,Harry Browne,Mother of the Groom,Uncle of the Groom |
| XMP dc Subject | Adam Browne,Bride,Brooke Browne,Brother of the Groom,Chloe Browne,Father of the Groom,Francis Browne,Groom,Harold Browne,Harry Browne,Mother of the Groom,Uncle of the Groom |
| XMP lr HierarchicalSubject | Bride|Brooke Browne,Brother of the Groom|Harry Browne,Father of the Groom|Francis Browne,Groom|Adam Browne,Mother of the Groom|Chloe Browne,Uncle of the Groom|Harold Browne |
| XMP iptcExt PersonInImage | Adam Browne,Brooke Browne,Chloe Browne,Francis Browne,Harold Browne,Harry Browne |
| XMP mwg-rs RegionName | Brooke Browne,Chloe Browne,Adam Browne,Francis Browne,Harold Browne,Harry Browne |
| XMP mwg-rs RegionType | Face,Face,Face,Face,Face,Face |
| XMP mwg-rs RegionAreaH | 0.09914,0.08828,0.10280,0.09212,0.10797,0.10673 |
| XMP mwg-rs RegionAreaW | 0.06593,0.05871,0.06837,0.06127,0.07180,0.07098 |
| XMP mwg-rs RegionAreaX | 0.46953,0.36771,0.56831,0.27943,0.79186,0.68801 |
| XMP mwg-rs RegionAreaY | 0.31314,0.35251,0.28597,0.31916,0.29617,0.27138 |
Filtering by Name or Role
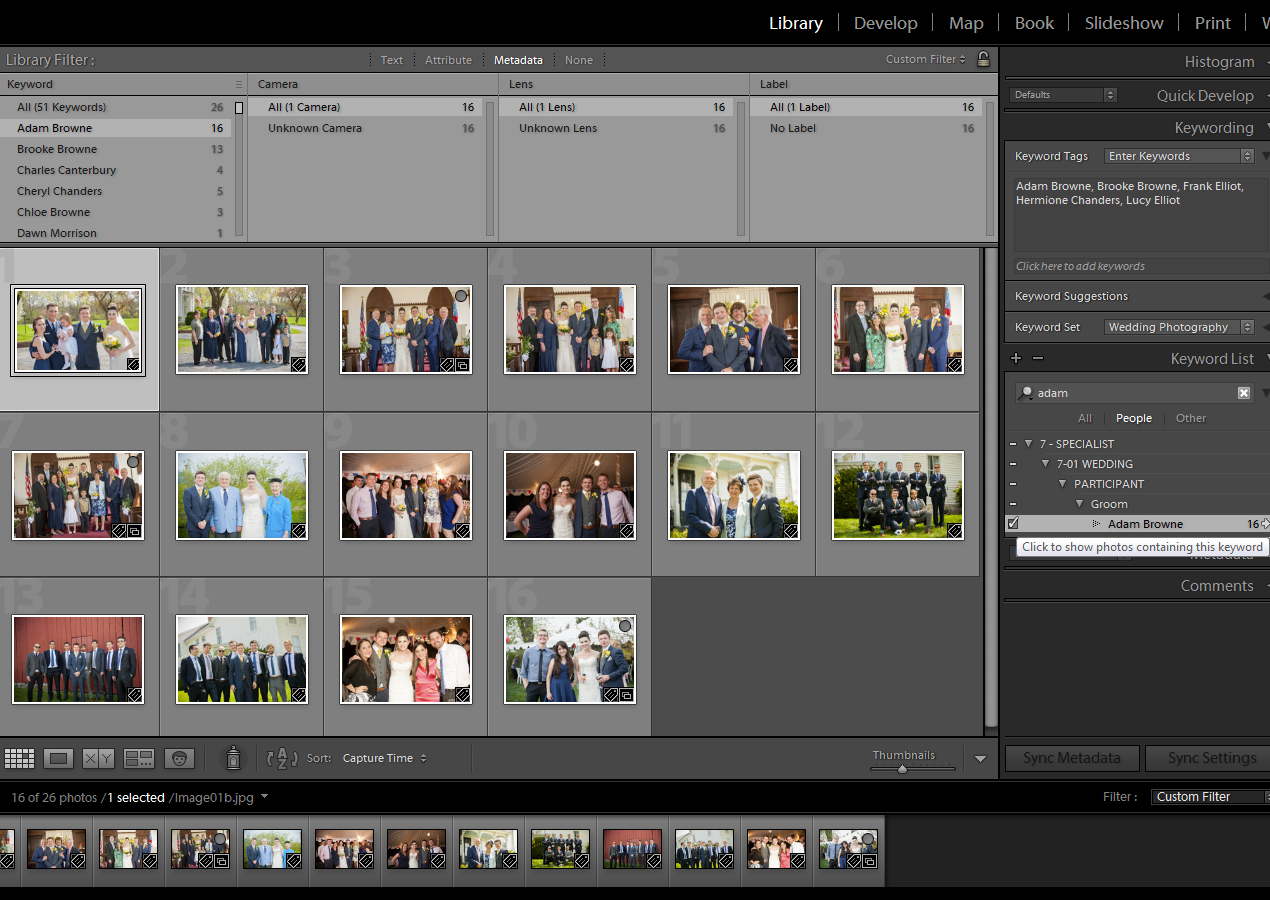
Once all the headshots in your catalog have been identified, it is a simple method to find all images of a person by name or by role. In the 'Keyword List' panel, click to select the word 'People' under the search box. (If you don't see the word 'People', click the black triangle to the right of the search box.) You can then enter the sought-after words in the search box, and see the Keyword List reduced to just those entries containing your word. Surprisingly, words act as individual entities. You might expect that entering 'John Smith' would only show listings for that individual, but what actually happens is that you see listings for everyone called 'John', and everyone called 'Smith'.
Once you have found the entry of interest in the 'Keyword List' panel, click the small arrow that appears to the extreme right of the entry, and all images containing that entry will be shown in a Grid View, and can be further explored in greater details with a Loupe View.


